

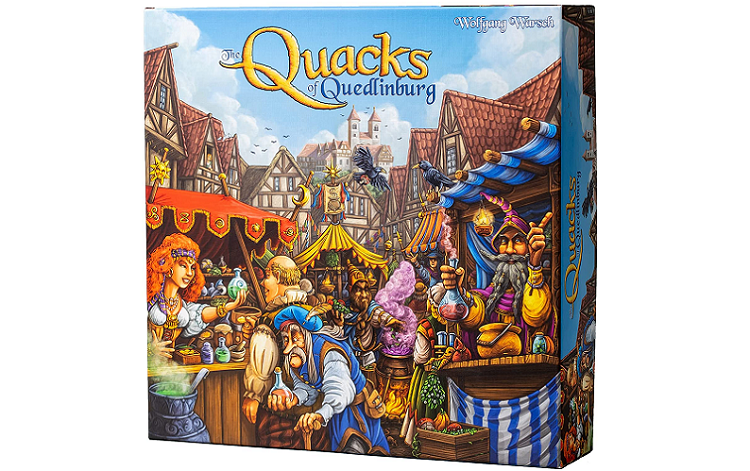
Have you ever dreamed of becoming a fraudulent witch doctor? What about a rip-off witch? If so, this potion-making game could be for you.
Quacks of Quedlinburg isn’t perhaps the most universally well-known board game out there, despite winning the Kennerspiel des Jahres (Game of the Year) award in 2018. It’s a typical game of chance and strategic risk-taking but with a few added twists.
Quacks of Quedlinburg (known in Germany as Die Quacksalber von Quedlinburg – “Quacksalber” roughly translating to “charlatan”, “medical fraud”, or “incompetent doctor”) can take a little while to get going. Still, I’ve found it pretty enjoyable once you’re up and running.
In this guide to Quacks of Quedlinburg, I’ll explain how to play, strategy tips, and mention a few things the reviews won’t tell you.
Let’s get into it.
Before You Begin
Quacks of Quedlinburg is a two to four player risk-management game. The more chance you take, the higher the likelihood of getting better results. However, at the same time, the greater the probability is of messing up.
In this game, you’ll throw ingredients into your “pot”. There are seven ingredient types (see the box contents section below). These have specific effects on your overall pot, detailed on the cards. The ones to watch out for are the white Cherry Bombs. Place too many, and your pot “explodes”, ending your phase immediately and limiting your options for the remainder of the turn.
The more ingredients you can put in, the more options you’ll have in the later stages of the turn.
Immediately, I should mention something that is often glossed over. Quacks of Quedlinburg contains a slightly daunting amount of material you’ll need to pop out and arrange at the start. When we first bought the game, this stage alone easily took us 10 minutes.
Box Contents
Before you start playing Quacks of Quedlinburg, make sure you have a reasonably large table on which to play! Within the box, you should find all of the following:
- 1 Scoring Track
- 8 droplets, 4 rat stones, and 4 scoring markers
- 1 Flame turn marker
- 4 Seals (0/50 on each side)
- 4 pots
- 24 Fortune-Teller cards
- 12 ingredient books (2x blue, 2x green, 2x yellow, 2x red, 2x purple, 1x orange, and 1x black)
- 215 ingredient chips (plus 3 replacement white chips)
- 1 Almanac of Ingredients booklet
- 4 bags
- 4 flasks
- 1 Bonus Die
- 20 rubies
As I mentioned, there’s quite a lot to think about. Ensure everything is there because you will need all of it.
How to Play
A quick online search suggested that Quacks of Quedlinburg takes five minutes to set up and about 45 minutes to play. That may be the case once you’re familiar with the rules and the turn sequences and you’ve got your head around the masses of material on the table in front of you.
However, if you’re playing it for the first time, you should allow a minimum of two to three hours to become acquainted with the many steps you have to take each round. There are seven pages of rules, after all.
A more realistic estimate, in my experience, is about 10 minutes to set up and around an hour for a game. Also, bear in mind that it can take 10 minutes to put away.
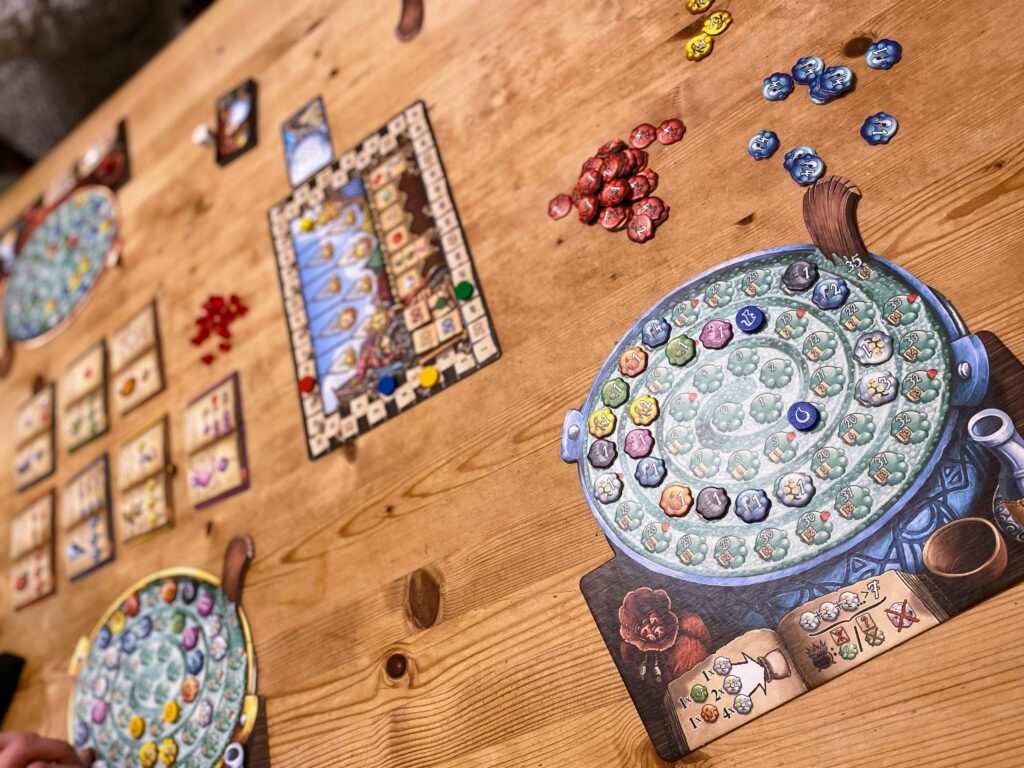
Setting the Quacks of Quedlinburg Table Up
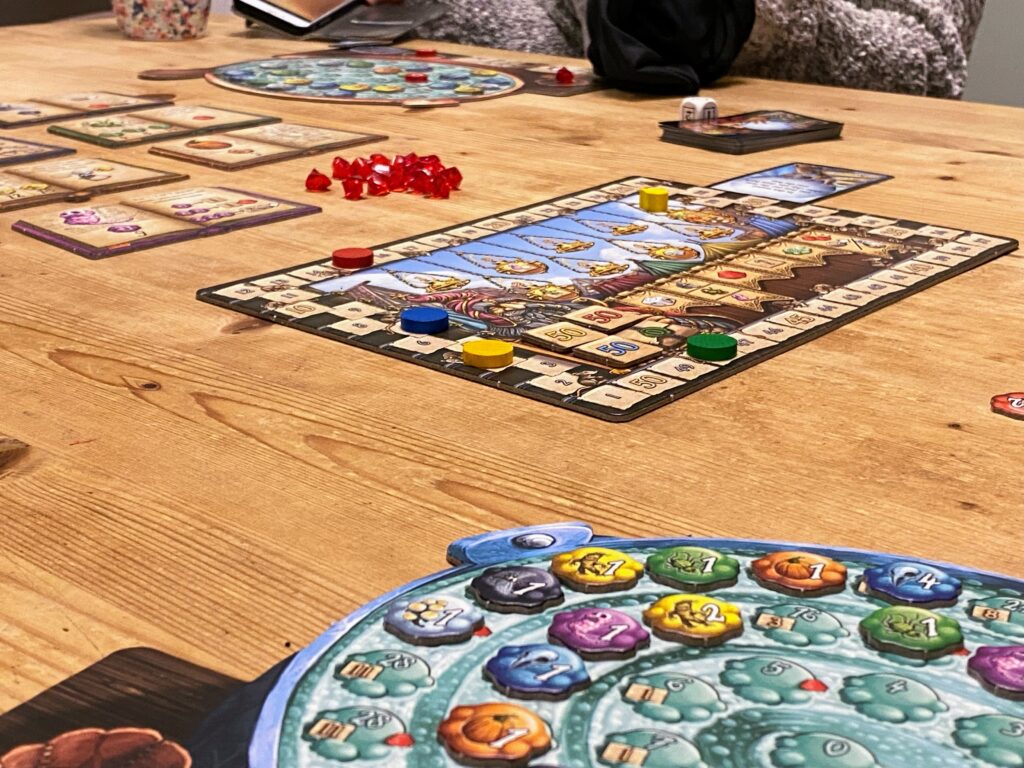
Give each player a pot. They are all different colors, and each person should receive an equivalent flask, droplet, scoring marker, and rat stone. Tell everyone to put the droplet on the “0” spot in the center of their pot.
The flask should be placed, full side up, in the large trivet in the bottom right of the board, with the rat stone in the small trivet next to it. Also, give everyone a bag.
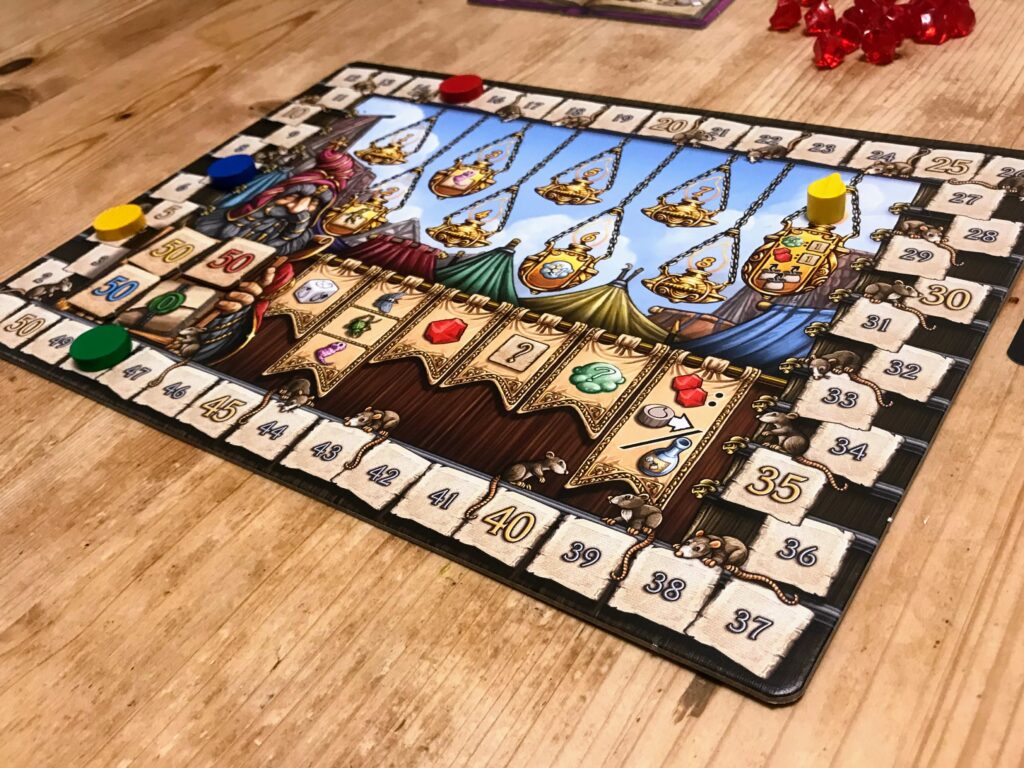
Place the Scoring Track in the middle, placing the Flame on the “1” lantern. This is simply a turn indicator, so you don’t lose track. The seals should go in the seal spaces in the bottom left of the Scoring Track, with the “0” showing. Put one scoring marker for each player next to the first space around the edge.
Finally, organize all the ingredients chips and cards into their respective colors and numbers, with the rubies in a contained pile somewhere nearby. Yellow (Mandrake) and purple (Ghost’s Breath) cards and chips shouldn’t be in play yet.
For your first go, the ingredients cards should be showing the Set 1 phase – you’ll see one bookmark sticking out of the pages.
The Bonus Die can go in any accessible place on the table. The 24 Fortune-Teller cards should be given to the player going first (whoever cooked last, according to the rules).
With me so far?
Playing Quacks of Quedlinburg
There are seven detailed pages of rules for Quacks of Quedlinburg. I’ll try to condense them for clarity and conciseness, but this will involve skipping certain details. So, to read “How to play” in as much detail as you like, head on over to Ultra Board Games by following this link. There is a direct copy of the Quacks rules book on this page. It will tell you (almost) all the minor details, everything you need to know.
Each player should take the chips as shown in the bottom left corner of their pot-board. These are then dropped into the bag. You are never allowed to look in the bag.
Each game always has nine turns. You’ll see the corresponding nine lanterns on the Scoring Track.
The player who goes first shuffles the Fortune-Teller cards and places them on the table face-down, drawing the top one. Purple cards have an immediate effect, whereas those with blue backgrounds are used either across or at the end of the turn.
Don’t worry about the rats for now. They only come into play in the second round, so I’ll explain how they work then.
Each turn consists of two phases: the Potions Phase and the Evaluation Phase.
The Potions Phase
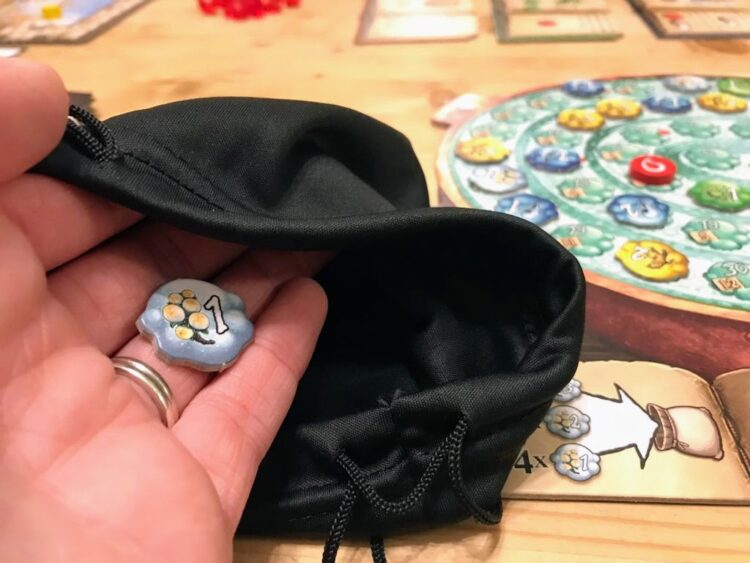
In this part of the game, you’ll blindly reach into your bag and pull out an ingredient chip (just one!). This chip will have a number between 1 and 4. Place it “in your pot” the corresponding number of spaces after the droplet (which is most likely still on space-0 in the first turn).
For example, if the chip shows a “1”, place it in the next space after the droplet. If it shows a “2”, put it two spaces after the droplet, and so on.
Everyone can do this simultaneously. It saves time, although if you suspect one person might cheat, you could always take turns to carefully examine what they do. Bear in mind that this gives the player going first a disadvantage. Everyone else will know what scores they should aim for!
Beware of your pot “exploding.” This happens when the white Cherry Bomb chips in it exceed the value of 7 (that is, they total 8 or more). If you do explode, it’ll affect what you can do in the next phase.
You can choose to stop drawing at any time. However, if you pull an ingredient chip out of the bag, you must place it.
There are a couple of exceptions here. First, you could use the flask to return a white chip to the bag. If you do this, you need to turn the flask upside-down, so it shows its empty side. However, remember that if you choose to draw again, you might pick it up once more, and the flask can’t be used a second time in the turn.
Some other ingredients chips can also affect what goes in – or comes out of – your pot. For example, yellows (Mandrakes) mean you can remove the previous chip if it’s a Cherry Bomb. Blues (Crow Skulls) allow you to draw a certain number of chips from the bag and then decide whether or not you want to place it.
Consult the Almanac of Ingredients for much more detailed information.
The Potions Phase finishes when everyone either voluntarily stops drawing (by laying their bag down) or explodes.
A player’s score is the space in the pot directly after the final ingredient chip they placed. Even if their pot exploded, this is still their score.
Evaluation Phase
The Evaluation Phase is where you receive your rewards based on the Potions Phase. There are six stages to this phase, conveniently known as A, B, C, D, E, and F. These are shown on the banner in the middle of the Scoring Track.
For each stage, begin with the player who went first and go clockwise around the table.
Players whose pots exploded cannot participate in Stage A and must choose one of Stage D or E.
- Evaluation Stage A – Bonus Die Roll. Whoever reached the highest score rolls the Bonus Die. If two players have the same score, the individual furthest from space-0 wins. If there is still a tie, both players get to roll it. Yay. The allotted bonus is explained in the rules.
- Evaluation Stage B – Chip Actions. Black, green, and purple chips all have end-of-round effects. Check if anyone has any and carry the respective actions out if applicable.
- Evaluation Stage C – Ruby Collection. Anyone who landed on a space with a ruby collects one and adds it to the ruby bag in the bottom left of their board.
- Evaluation Stage D – Victory Points. On your scoring space, you’ll see a smaller number. This is how many Victory Points you gain. Move the scoring marker around the Track the appropriate number of squares.
- Evaluation Stage E – Buying Chips. You can now “spend” your score. You may buy no more than two chips, and they can’t be of the same color. The prices are shown on the cards. Once everyone has finished, they should place these chips back into their draw bag and gather all the chips on their board. These also return to the draw bag.
- Evaluation Stage F – Rubies at the End of Turn – you can choose to spend 2 rubies (if you have them) to move the droplet one space forward or refill your flask, making it available for the next turn. If you have 4 rubies or more, you could choose to do two or more of these actions.
Finishing the Turn
After Evaluation Stage F has finished, move the Flame turn indicator to the next lantern (turn 2). During particular rounds, certain things are added to the game. At the start of…
- … Turn 2, bring out the Mandrakes (yellows). Players can now buy these in Stage E.
- … Turn 3, bring out the Ghost’s Breath (purple) chips and cards. Players can now also purchase these in Stage E.
- … Turn 6, add one more Cherry Bomb (white) 1-chip to everyone’s bags.
The player who went first passes the Fortune-Teller cards to the player on their left. They will draw the next card to start the turn and become the starting player. For the next turn, they’ll pass it on again, and so on.
The Rats
The rats also come into play during the second turn (and continue through to the end of the game). They are essentially a handicap bonus for players lagging behind in the scoring. Place the rat stones (explained below) after the Fortune-Teller card has been drawn but before the Potions Phase.
Take a look at the Scoring Track, where you’ll see a rat (and its tail) dividing every two squares. Each player should count how many rat tails are between them and the person currently in first. Let’s say there were two. The player can now place their rat stone two spaces past their droplet.
This bonus allows players lagging behind to keep moving at a similar pace to the other players and potentially get a higher score in the upcoming Potions Phase.
Of course, the player currently leading the Scoring Track always receives no rats.
The turn then continues onto the Potions Phase as above and goes on as per the instructions. This cycle repeats to the end of the game at the ninth turn.
Ending the Game
There are nine turns in each game, so there’s a definite ending. Once the last turn has finished, you can trade the following:
- 5 “coins” (scoring points) for 1 Victory Point
- 2 rubies for 1 Victory Point
Use up all your remaining scoring points and rubies on this turn. As usual, if your pot has exploded, you must choose between taking the Victory Points as it shows on your final scoring space or trading five “coins” for 1 Victory Point.
The winner is whoever has the most Victory Points (whoever has covered the most ground on the Scoring Track).
If there’s a tie, whoever had the highest score in the last round wins. If it’s still a tie, congratulations; you can share the title.
Consider playing again using different Sets on the ingredient cards. These change the ingredients’ effects, completely altering how the game develops. The higher the Set number, the more complicated the resultant action.
Quacks of Quedlinburg Strategy Tips
I wouldn’t consider myself any kind of Quacks expert – just to make that clear. I haven’t played nearly enough games. However, based on my experience, some strategic approaches certainly work – and some certainly don’t (see “Common mistakes to avoid” below).
Once you’ve started Quacks and got a few rounds in, there’s very little room to change your strategy. You’re stuck with what you’ve got. Therefore, it’s essential to make the right decisions early on. In this game, a good start often equals a strong finish.
Get as far Around the Pot as Possible
It’s not the be-all-and-end-all, but getting as far as you possibly can is a great way to ensure victory. Of course, you’ll need to balance the risk with the Cherry Bombs.
Don’t forget about the flask, which can return one white chip to the bag per round (provided it’s the most recent one you played and it didn’t make your pot explode).
The more distance you can put between your final ingredient chip and space-0, the more Victory Points and “coins” you’ll earn. While you can earn Victory Points from certain ingredient chips, Fortune-Teller cards, and in the last round, the main bulk will come from your Potions Phase each round. At the end of the day, these are what win the game.
Complementary Ingredients
Different ingredients work in tandem with each other to produce concentrated impacts on your pot. For example, in Set 1, you’ll notice that when Mandrakes (yellows) are played after Cherry Bombs (whites), you can remove the Cherry Bomb from your board, replacing it in the bag.
As such, filling your pot with a high concentration of Mandrakes makes it more likely you’ll cover more distance through the pot.
Blue Crow Skulls are also an effective ingredient in Set 1. They allow you to draw 1, 2, or 4 chips from your bag (depending on the value of the blue one you placed last). You can then decide which – if any – of these you’d like to play next. These give you slightly greater control over what chips appear in your pot and, crucially, in what order.
Red Toadstools and orange Pumpkins also intersect in Set 1. Pumpkins alone are a cheap filler for your pot with no bonus effect. However, if when you place a Toadstool, there is already one (or two) Pumpkins in the pot, you may push the chip forward one extra space. If there are three or more oranges down, you get to move two spaces forward.
This strategy only really becomes effective when you have a significant proportion of Pumpkins and Toadstools in your bag – perhaps four or more of each.
Remember, with every Set, these relationships between the ingredients completely change. Here’s another link to the Almanac of Ingredients for you to check out.
Post-Potions Phase Ingredients
Blacks (African Death’s Head Hawkmoth), Greens (Garden Spider), and Purples (Ghost’s Breath) impact the game only after the completion of the Potions Phase.
Black and Purple chips are generally more impactful. They mean you can move your droplet forward and/or gain Victory Points and rubies. Green Garden Spiders are cheaper and, while they’re still helpful, have less of an effect. Controlling the African Death’s Head Hawkmoths and Ghost’s Breaths can give you a valuable foothold.
Invest in High-Value Chips
It’s really tempting to stock up on 1-chips – these will allow you to move just one space along in the pot. However, the further you can get around the board risk-free, the better. As a result, throw your “coins” into 2- and 4-chips.
Probability dictates that they won’t have much impact in the first three or four rounds. However, as time moves on, they should provide you with an extra bit of momentum that other players will be lacking.
Common Mistakes to Avoid
One clear thing has led to winning or losing in the games I’ve played: whether or not your pot explodes.
An exploding pot means the player must choose between Victory Points and “coins” (spending their score). As such, they either get left behind on the Scoring Track or can’t add more chips to their bag.
Once a player has been left for dead in terms of Victory Points, the only way back is for the players ahead of them to take one risk too many and explode their pot.
Sure, the rat stones can give you an advantage in your pot – but you’ll still find it challenging to catch up. They essentially mean you can progress at a similar rate to everyone else – but catching them up is another story altogether.
The rats, then, probably won’t pull you back into the race for first if you’ve exploded unless the players ahead of you make that same mistake.
This, then, begs the following conclusion: a lower-risk strategy is more likely to win.
If all players are aware of this, everyone will play more cautiously. The winner is more likely to be decided through strategic ingredient chip purchases, which is more interesting anyway.
To summarise, if your pot explodes, the only way back into the game is for the other players’ to also explode. In short, don’t let your pot explode!
Quacks of Quedlinburg: game variation

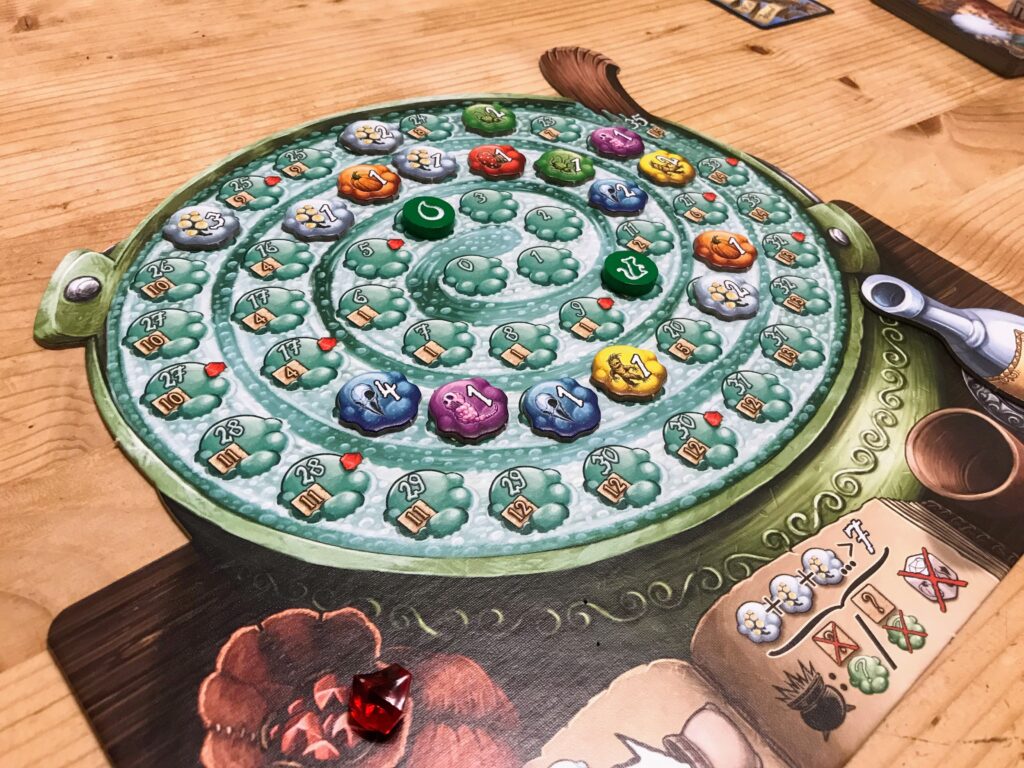
I’ve owned Quacks for some time but never played using the “other side” of the board. Honestly, it took me so long to remember the rules and what goes where in every turn that I was quite put off trying something new.
The other side of the pot looks complicated at first glance. But then, what doesn’t in this game? You have the same bubbling mass in the center (although it now spirals out clockwise – it’s a mirror image of the usual side). Your rat stone plate and potion bottle remain. The only difference is that intriguing line of Quacks things at the bottom.
Thankfully, it’s much easier to play than I initially thought. You play the game almost exactly the same way as normal. I won’t go through that again – we’d be here forever!
The only difference is that you get an extra droplet piece on your pot board. One droplet goes on the “0” spot, as per usual. The other one, which usually sits aside when you’re playing and looks like a spare, goes on the first empty test tube along the bottom.
Now, when you’re playing, you can either move the droplet in your pot or the one at the bottom. The pot droplet moves one space forward, as is the norm. The droplet on the rack moves to the subsequent test tube.
When you reach the next vial, you take the reward shown instantly. For example, the first reward is one ruby. The next is one victory point, and the third is one blue 1-chip. As you progress through the 12 vials, the prizes become more and more worth it. For instance, the last two are one yellow 4-chip and four victory points.
Although we were scared this would make the game overly complicated, our game was closer than usual. Ultimately, it still came down to not exploding and a decent chip strategy. However, I found that things went exponentially uphill once I got to the fifth test tube (which gives you a black 1-chip). If you can get ahead with your test-tube droplet, it’ll give you a significant advantage.
My main tip is to invest in anything that’ll allow you to move your droplet. Perhaps that’s not very surprising! The most obvious example is the African death’s head hawkmoth (the black chips). You could also look at the Garden spiders (greens) in Set 4 or the Ghost’s breath (purples) in Sets 1 and 2. You could also use rubies, as usual, and some Fortune Teller cards also give you the option.
The primary strategy remains the same: don’t explode. This variation does add an enjoyable tweak to the game. Just make sure you’re well-acquainted with the standard version first.
I imagine we’ll usually play with this variation of Quacks of Quedlinburg from now on. We liked it that much.
Where Can I Get Quacks of Quedlinburg?
Quacks of Quedlinburg is available from Amazon through this link. However, you might find cheaper versions on eBay or from local gaming stores (have a quick search online for one near you that stocks it). If you’re prepared to buy a second-hand version, that’s definitely the cheapest way to get hold of a copy.
You might also be interested in accessories such as these base sleeves and trays from Etsy. They really help to keep the chips and cards organized and accessible.
FAQs
Question: Can you play Quacks of Quedlinburg with two players?
Answer: You can undoubtedly play Quacks with two players. It actually has minimal impact on the game whether you play with two, three, or four since it’s mostly about your pot and your resultant actions.
Some ingredient chips are dependent on “the player next to you” or “the player on either side of you”. In a two-player game, these can still apply, although, of course, the person opposite you will be both.
Other than that, it’s basically exactly the same. Why not give it a go?
Question: How Long is Quacks of Quedlinburg?
Answer: Officially, Quacks of Quedlinburg takes five minutes to get ready and 45 minutes to play.
Most of the games I’ve played have, in reality, taken about 10 minutes to set up and nearer to 60 minutes to complete. If everyone helps prepare the game, it might take five – assuming they all know what they’re doing.
The same is true for the gameplay time. A 45-minute game might be possible once the rules are second-nature to all players. However, in the meantime, you should allow a bit longer.
(Also, allow five to 10 minutes to put the game away! There’s a lot of stuff to organize!)
Question: How Many Chips are in the Quacks of Quedlinburg?
Answer: Quacks of Quedlinburg contains 215 ingredient chips, made up as follows:
• White – Cherry Bomb – 20x 1-chip, 8x 2-chip, 4x 3-chip (plus spares: 1x 1-chip, 1x 2-chip, 1x 3-chip)
• Green – Garden Spider – 15x 1-chip, 10x 2-chip, 13x 4-chip
• Blue – Crow Skull – 14x 1-chip, 10x 2-chip, 10x 4-chip
• Red – Toadstool – 12x 1-chip, 8x 2-chip, 10x 4-chip
• Yellow – Mandrake – 13x 1-chip, 6x 2-chip, 10x 4-chip
• Purple – Ghost’s Breath – 15x 1-chip
• Orange – Pumpkin – 20x 1-chip
• Black – African Death’s Head Hawkmoth – 18x 1-chip
Including the replacement whites, there are 218 chips.
Conclusion
An excellent way to conclude my thoughts on Quacks of Quedlinburg is to consider who this game is actually for, in my personal opinion.
The answer isn’t as straightforward as many board games because Quacks is a bit of an oxymoron. I’ll explain what I mean.
The base concept is relatively simple – it’s a reasonably basic probability tree of risk and reward management. However, while not exactly complicated, the resulting Evaluation Phase has an awful lot of steps (six sub-phases), all of which require your careful attention. Therefore, it’s quite a tricky – but also straightforward – game. It’s easy but also baffling. Undemanding, uncomplicated, and elementary, but also elaborate, intricate, and at times overwhelming.
It would be difficult to whisk this game out on a Saturday night with your friends unless they knew how to play in advance. Learning the game takes a solid couple of hours, and it would probably be best to devote an afternoon to it sometime.
That being said, once you have the rules and processes cemented in your mind, you’ll probably find the games start to flow much quicker. You’ll also begin to appreciate the different strategic approaches you can take and how to manipulate the likelihood of your victory.
Although it has complex aspects, Quacks of Quedlinburg is a family-friendly game. There are very few ways in which you can sabotage your opponents, making the game entirely about your own skill and risk strategies. In general, this helps to guard against tantrums and outbursts, except for the odd sigh at your own ridiculously improbably bad luck.
So, who is Quacks for? I’d say it’s for beginner serious board gamers. If you’ve advanced past the classics – Monopoly, Risk, Settlers of Catan, Carcassonne, and so on – Quacks is a sort of stepping-stone as you head towards more complicated games like Twilight Imperium, Warhammer, Diplomacy, and Battlestar Galactica: The Board Game.
I’d recommend it for families and friends that regularly sit down to play fairly advanced games. Particularly young kids and casual gamers might struggle a little to maintain interest.
There are a few textual/translation problems here and there, but they’re few and far between. The main issues, for me, come from slightly unclear rules, how long setup takes, the confusing use of the word “coins” (when there aren’t any really), and – predominantly – that there’s probably just one thing too many going on in the Evaluation Phase.
However, overall, I like it. It’s an interesting perspective on both the risks you’ll take and how you’ll use your rewards to prepare going forward. When playing, if there’s one thing to remember, it’s this: don’t let your pot explode! You’ll figure out the rest as you’re going along.
Looking for more interesting readings? Check out:
- Terraforming Mars Guide: Fighting for Spaces in Space - April 22, 2023
- Zathura Board Game Guide - April 20, 2023
- Ark Nova Guide – Zoo Complex, Or Complex Zoo? - April 8, 2023